by
on
0
You’ve built your WordPress website — now it’s time to understand who’s visiting it, where they’re coming from, and what they’re doing once they land on your pages. That’s exactly what Google Analytics does.
Without tracking data, you’re essentially flying blind. You can’t improve what you don’t measure. Whether you’re running a blog, an eCommerce store, or a business website, adding Google Analytics to WordPress is one of the first and most important steps you can take toward growing your online presence.
The good news? It’s easier than you think — and you don’t need to be a developer to do it.
This guide walks you through two reliable methods to connect Google Analytics to your WordPress site, so you can start collecting valuable data right away.
What Is Google Analytics and Why Does It Matter?
Google Analytics is a free web analytics tool from Google that tracks and reports website traffic. It gives you detailed insights into:
- How many people visit your site (and when)
- Where your traffic comes from — organic search, social media, direct, referral
- Which pages perform best and which ones lose visitors
- How long users stay on your site
- Conversion rates if you’ve set up goals
For WordPress site owners, this data is gold. It helps you make smarter content decisions, improve user experience, and ultimately drive more conversions.
Step 1: Set Up a Google Analytics Account
Before adding anything to WordPress, you need a Google Analytics property set up.
If you don’t already have an account with Google Analytics, the first step is to create one. The setup process is straightforward and only takes a few minutes.
1. Start the Sign-Up Process
Go to the Google Analytics website analytics.google.com and click “Start Measuring.” This will begin the account creation process.
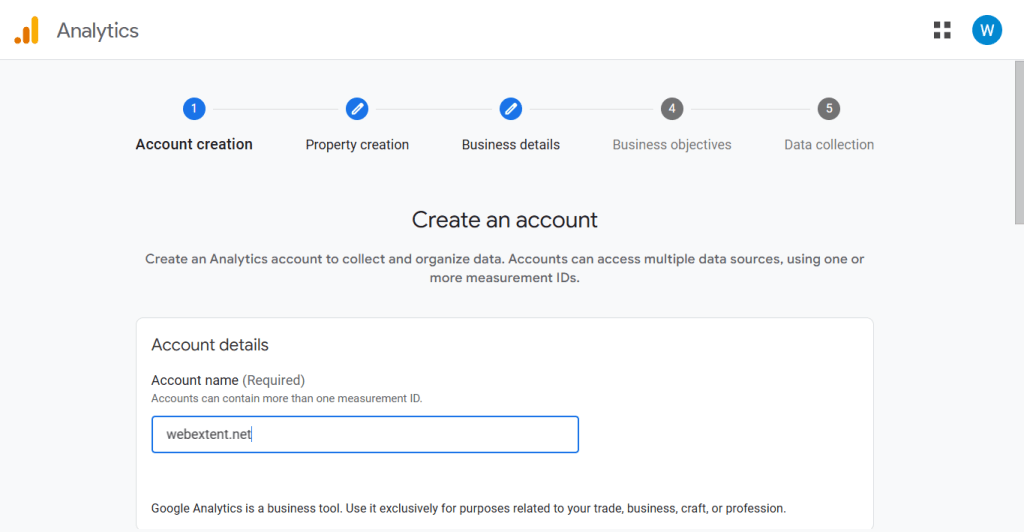
2. Create Your Account
Next, enter an Account Name. This is usually your business or website name.
You’ll also see data-sharing settings that allow you to control how much information your site shares with Google. You can adjust these options based on your privacy preferences.
3. Create a Property
The next step is to create a property, which represents the website or app you want Google Analytics to track.
Here you will:
- Enter your website or business name
- Select your reporting time zone
- Choose your local currency
This information helps Google organize and display your analytics data accurately.
4. Describe Your Business
Now you’ll provide some basic details about your website or company.
You will select:
- The industry category that best matches your niche
- The size of your business
This information helps Google tailor reports and recommendations for your analytics account.
5. Select Your Business Objectives
Next, choose the goals you want to achieve using Google Analytics.
For example:
- Understanding website traffic
- Generating leads
- Tracking online sales
- Measuring user engagement
If your goal is to increase blog traffic, you can select “Understand web and/or app traffic.” You can choose multiple objectives if needed.
6. Accept the Terms of Service
Click Create and review Google’s Terms of Service Agreement. After accepting the terms, your Google Analytics property will be created.
7. Set Up a Data Stream
The final step is to configure a data stream, which allows Google Analytics to start collecting data from your website.
Choose Web and then:
- Enter your website URL
- Add a Stream Name (usually your website name)
By default, Enhanced Measurement is enabled. This allows Google Analytics to automatically track user interactions such as page views, scrolling, outbound clicks, and file downloads. If you prefer to track only basic page views, you can disable this option.
8. Finish the Setup
Click “Create and continue.” Your Google Analytics account will now be ready, and you’ll receive the tracking details needed to connect it to your WordPress website.
Once connected, Google Analytics will begin collecting valuable data about your visitors and their behavior.
Get Your Measurement ID (GA4)
After creating your property, Google will walk you through setting up a Data Stream:
- Choose Web as your platform
- Enter your website URL and stream name
- Click Create Stream

You’ll now see your Measurement ID — it looks like G-XXXXXXXXXX. Copy this. You’ll need it shortly.

Method 1: Add Google Analytics to WordPress Using a Plugin (Recommended)
For most WordPress users, using a plugin is the simplest and most beginner-friendly approach. There’s no need to touch any code.
Best Plugin Options
- Site Kit by Google — Official Google plugin, connects Analytics, Search Console, and more
- MonsterInsights — Most popular analytics plugin with a clean dashboard inside WordPress
- ExactMetrics — Feature-rich alternative with eCommerce tracking support
Using Site Kit by Google (Step-by-Step)
Site Kit is the official solution from Google and is completely free.
- In your WordPress dashboard, go to Plugins → Add New
- Search for “Site Kit by Google”
- Click Install Now, then Activate
- In the left sidebar, click Site Kit → Start Setup
- Click Sign in with Google and choose your Google account
- Grant the necessary permissions
- Connect your Search Console property (it will auto-detect your site)
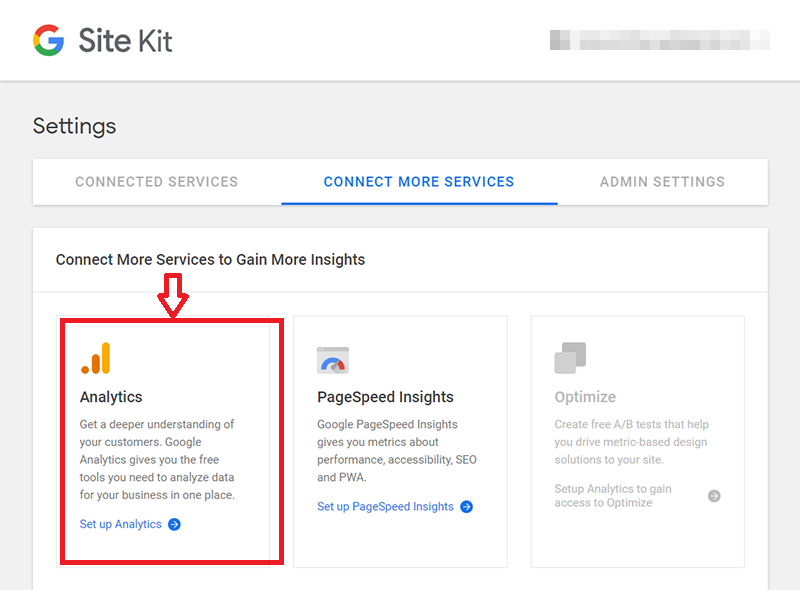
- Once setup is complete, go to Site Kit → Settings → Connect More Services
- Click Analytics and follow the prompts to connect your GA4 property
- Select your existing property or create a new one directly from WordPress
That’s it. Site Kit will automatically insert the tracking code across your entire website.
Using MonsterInsights (Step-by-Step)
- Go to Plugins → Add New and search for MonsterInsights
- Install and activate the free version
- Click Insights → Launch Setup Wizard
- Select your website category and click Save and Continue
- Click Connect MonsterInsights
- Sign in with your Google account and grant permissions
- Select your GA4 property from the dropdown
- Click Complete Connection
MonsterInsights also gives you a built-in reports dashboard inside WordPress — a nice bonus for quick traffic checks without leaving your admin panel.
Method 2: Manually Add Google Analytics to WordPress (No Plugin)
If you prefer a lightweight setup without adding another plugin, you can insert the Google Analytics tracking code directly into your theme. This method requires basic comfort with WordPress theme files.
Add the Code via Theme Header (functions.php)
Important: Before editing theme files, either use a child theme or a plugin like Code Snippets to safely add custom code. Editing the parent theme directly means your changes will be lost after a theme update.
Using Code Snippets (Safest Manual Method)
- Install and activate the free Code Snippets plugin
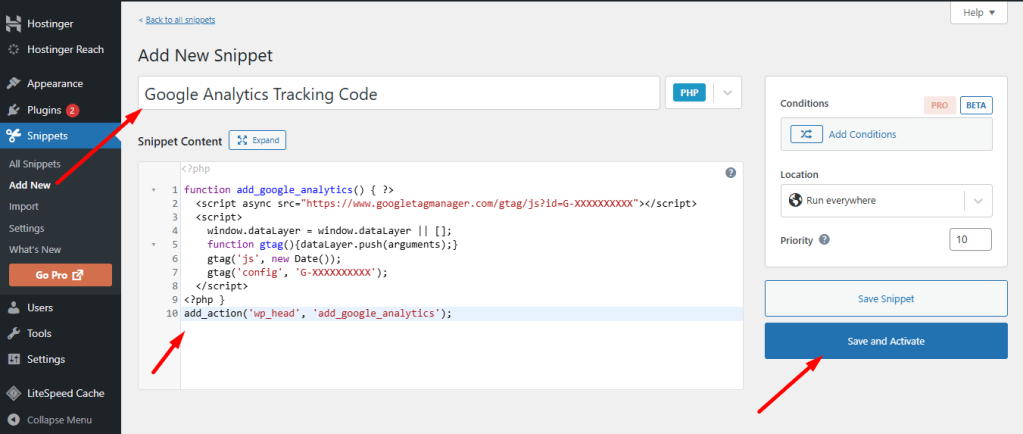
- Go to WordPress Dashboard → Snippets → Add New
- Give the snippet a name (for example: Google Analytics Tracking Code)
- Paste the tracking script into the code editor
Directly via functions.php (Advanced Users)
- Go to Appearance → Theme File Editor
- Open functions.php
- Add the following at the bottom, replacing
G-XXXXXXXXXXwith your actual Measurement ID:
php
function add_google_analytics() { ?> <script async src="https://www.googletagmanager.com/gtag/js?id=G-XXXXXXXXXX"></script> <script> window.dataLayer = window.dataLayer || []; function gtag(){dataLayer.push(arguments);} gtag('js', new Date()); gtag('config', 'G-XXXXXXXXXX'); </script> }add_action('wp_head', 'add_google_analytics');- Click Update File

This inserts the tracking script into the <head> section of every page on your site.
Step 3: Verify Google Analytics Is Working
After installation, you’ll want to confirm that data is being collected correctly.
Use Google’s Real-Time Report
- Log into your Google Analytics account
- In the left menu, click Reports → Realtime
- Open your website in a new browser tab
- Check if your visit registers as an active user in the Realtime view
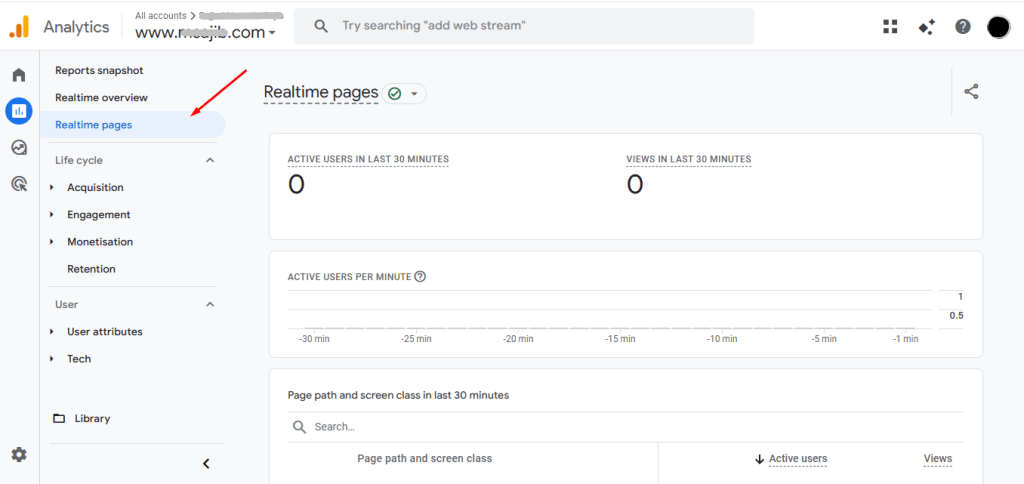
If you see yourself show up, congratulations — your tracking is live.
Use Google Tag Assistant
Install the Google Tag Assistant Chrome extension. Visit your website and click the extension icon to verify that your GA4 tag is firing correctly on each page.
Common Issues and How to Fix Them
Even a smooth setup can hit a snag. Here are the most frequent problems and quick fixes:
- No data showing up: Wait 24–48 hours — GA4 can have a slight delay for standard reports
- Duplicate tracking: If you used both a plugin and manual code, remove one to avoid counting visits twice
- Tag not firing: Check that your Measurement ID is correct and matches your GA4 property
- Cache conflicts: If you use a caching plugin, clear your cache after installation
- Ad blockers: Some browsers or extensions block analytics scripts — this is normal and expected
Tips to Get More From Google Analytics on WordPress
Once your tracking is set up, take these next steps to unlock deeper insights:
- Link Google Search Console to see which keywords drive traffic
- Set up Conversion Events to track form submissions, button clicks, and purchases
- Enable Enhanced Measurement in GA4 to auto-track scroll depth, outbound clicks, and video engagement
- Create Audiences for remarketing campaigns
- Explore the Funnel Exploration report to see where users drop off in your conversion path
These features are all accessible through your Google Analytics dashboard and pair seamlessly with WordPress — especially when connected through internal analytics tools and SEO plugins.
Conclusion
Adding Google Analytics to your WordPress website is one of the smartest moves you can make as a site owner. Whether you go the plugin route with Site Kit or MonsterInsights, or prefer a manual code approach, the process is straightforward and takes less than 15 minutes.
Once your data starts flowing, you’ll have everything you need to make informed decisions — from improving underperforming pages to doubling down on your highest-traffic content.
Don’t wait to start tracking. Every day without analytics is a day of lost insights.


0 comments