by
on
0
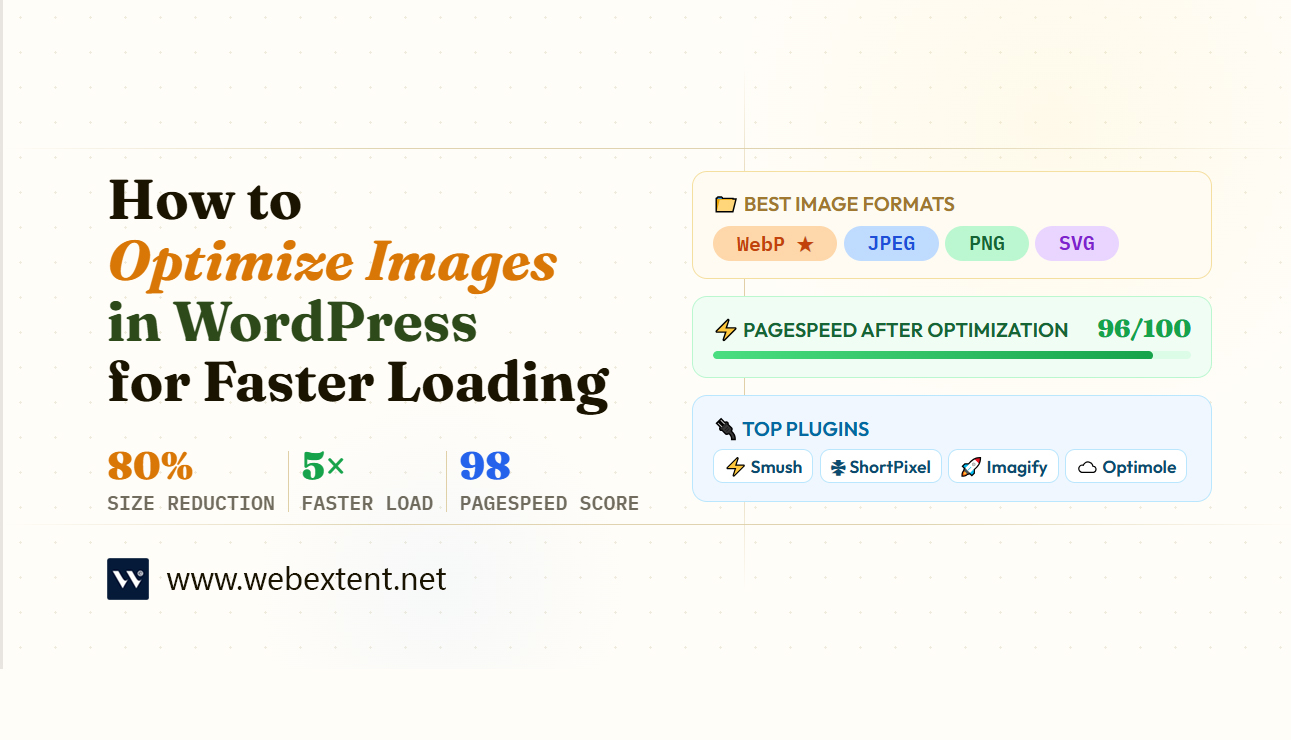
Images are essential to any engaging WordPress website — but they are also one of the biggest causes of slow page load times. A single unoptimized image can add seconds to your load time, frustrate visitors, and tank your search rankings. If you want a fast, high-performing website, learning how to optimize images in WordPress is non-negotiable.
In this guide, you will learn proven, actionable techniques to reduce image file sizes, choose the right formats, configure WordPress plugins, and implement best practices that improve both site speed and SEO performance.
Why Image Optimization Matters for WordPress Performance
Google considers page speed a direct ranking factor — and images often account for 50–80% of a webpage’s total file size. Slow-loading pages lead to higher bounce rates, lower dwell time, and ultimately fewer conversions. Optimizing your images directly impacts:
• Core Web Vitals scores, especially Largest Contentful Paint (LCP)
• Mobile user experience, where bandwidth is limited
• Search engine crawl efficiency and indexing speed
• Overall WordPress hosting costs by reducing bandwidth usage
The good news: you do not need to be a developer to implement image optimization. With the right tools and techniques, anyone can dramatically speed up their WordPress site.
Choose the Right Image Format
Selecting the correct image format before uploading is the single most impactful step you can take. Different formats serve different purposes, and using the wrong one means unnecessary file bloat.
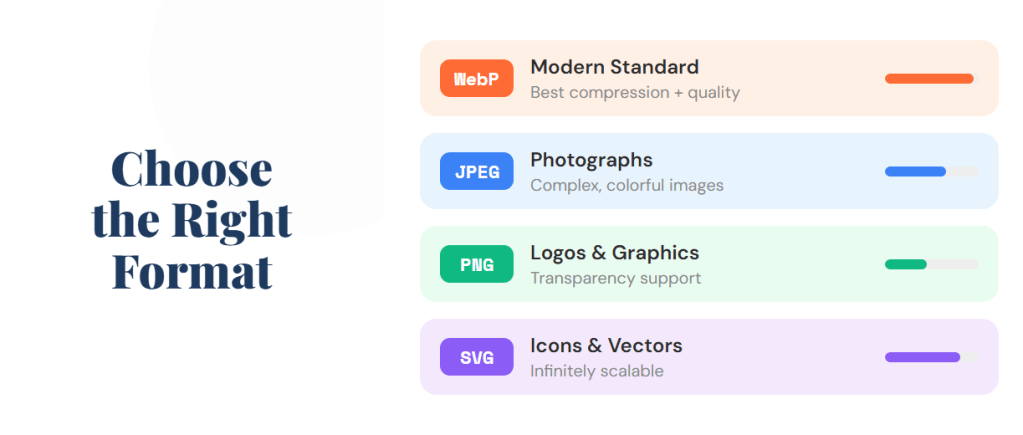
WebP: The Modern Standard
WebP is now the recommended image format for the web. It delivers significantly smaller file sizes compared to JPEG or PNG while maintaining excellent visual quality. Most modern browsers support WebP, and WordPress 5.8+ natively handles WebP uploads. If you are not already using WebP, switching is one of the most effective ways to reduce image file sizes across your site.
JPEG vs PNG: Know When to Use Each
• JPEG: Best for photographs and complex images with many colors. Use a quality setting between 70–85% for an ideal balance of size and clarity.
• PNG: Best for graphics, logos, and images that require transparency. PNG files are larger but lossless.
• SVG: Ideal for icons and logos since SVG files are vector-based and infinitely scalable without losing quality.
Resize Images Before Uploading to WordPress
One of the most common mistakes WordPress users make is uploading full-resolution images directly from a camera or stock photo site. A 6000px-wide image displayed in a 800px container still carries the full weight of the original file — meaning unnecessary data is loaded every time a visitor views that page.
Before uploading, resize your images to the maximum display width your theme uses. For most WordPress themes, this is between 1200px and 2000px wide. Tools like Adobe Photoshop, GIMP, Canva, or the free web app Squoosh let you resize and compress images before they ever hit your media library.
This one step alone can reduce file sizes by 60–80% before any additional compression is applied.
Compress Images Without Losing Quality
Image compression removes unnecessary data from files without visibly degrading image quality. There are two types:
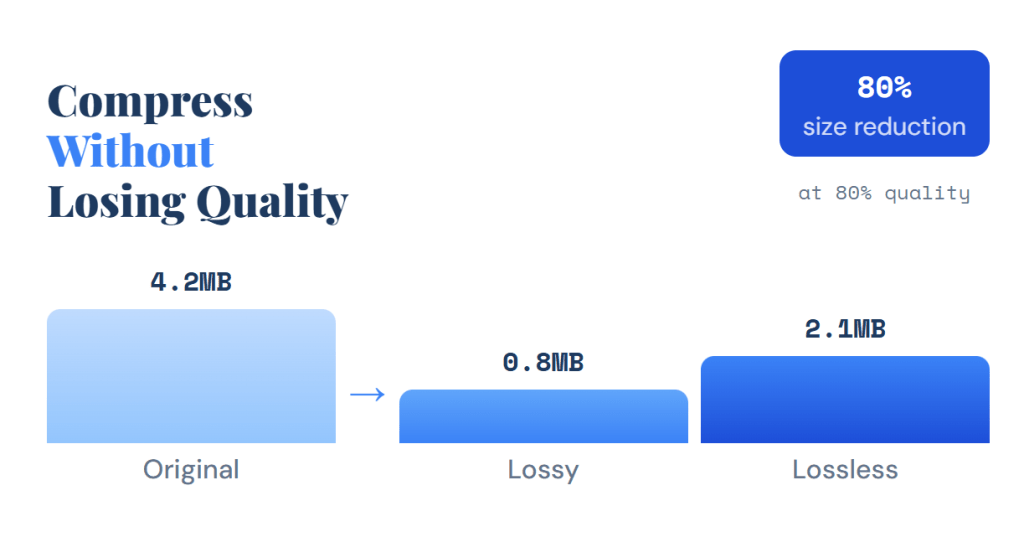
• Lossy compression: Reduces file size significantly by permanently removing some data. Best for photographs.
• Lossless compression: Reduces file size without losing any image data. Slower and less dramatic, but suitable for graphics and logos.
For most websites, lossy compression at 70–85% quality is the sweet spot. You get dramatically smaller files with no perceptible difference to the human eye.
Best WordPress Image Optimization Plugins
WordPress plugins make image optimization accessible without any technical knowledge. The following are widely used and trusted for image compression, conversion, and delivery.
Smush
Smush is one of the most popular WordPress image optimization plugins with over a million active installations. It automatically compresses images on upload, strips unnecessary metadata, and offers bulk optimization for your existing media library. The free version handles most use cases, while the Pro version adds WebP conversion and CDN delivery.
ShortPixel Image Optimizer
ShortPixel delivers excellent compression results and supports WebP and AVIF conversion. It uses external servers to process images, which keeps your server resources free. The plugin offers both lossy and lossless compression modes and allows you to compare the original versus optimized image directly in your dashboard.
Imagify
Made by the same team behind WP Rocket, Imagify is a user-friendly plugin that automatically converts images to WebP and compresses them on upload. It offers three compression levels — Normal, Aggressive, and Ultra — giving you fine-grained control over the quality versus size trade-off.
Optimole
Optimole works differently from most plugins: it processes and serves images via its own cloud CDN. This means images are automatically resized to fit the viewer’s screen, served in the best format their browser supports, and delivered from a server geographically close to the visitor.
Enable Lazy Loading for Images
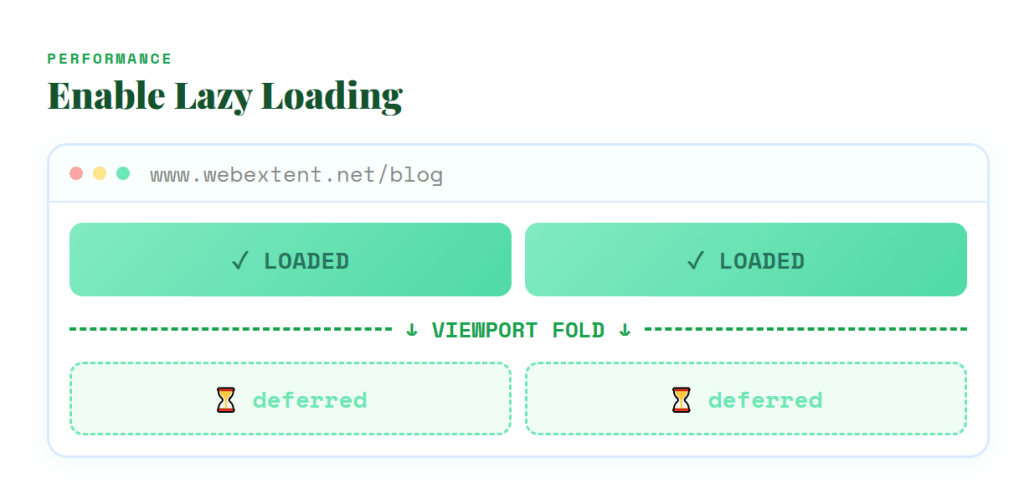
Lazy loading defers the loading of off-screen images until the user scrolls near them. This means your initial page load is much faster because the browser only loads images that are actually visible in the viewport.
Since WordPress 5.5, lazy loading is enabled by default for all images via the native loading=”lazy” attribute. This happens automatically — but it is worth confirming your theme and page builder are not overriding this behavior. You can check this by inspecting your images in the browser developer tools.
For hero images or images visible above the fold, you should set loading to “eager” so they load immediately and do not delay your LCP score.
Serve Images Through a Content Delivery Network (CDN)
A Content Delivery Network stores copies of your images on servers distributed around the world. When a visitor loads your page, images are served from the server closest to them geographically — dramatically reducing latency.
Popular CDN options compatible with WordPress include Cloudflare, BunnyCDN, KeyCDN, and StackPath. Many managed WordPress hosts also include a CDN as part of their hosting plan. Combining a CDN with a solid image compression plugin is one of the most powerful performance combinations available.
Optimize Image Filenames and Alt Text for SEO
Image optimization is not only about file size — it also includes on-page SEO. Search engines cannot “see” images, so they rely on surrounding text signals to understand what an image contains.
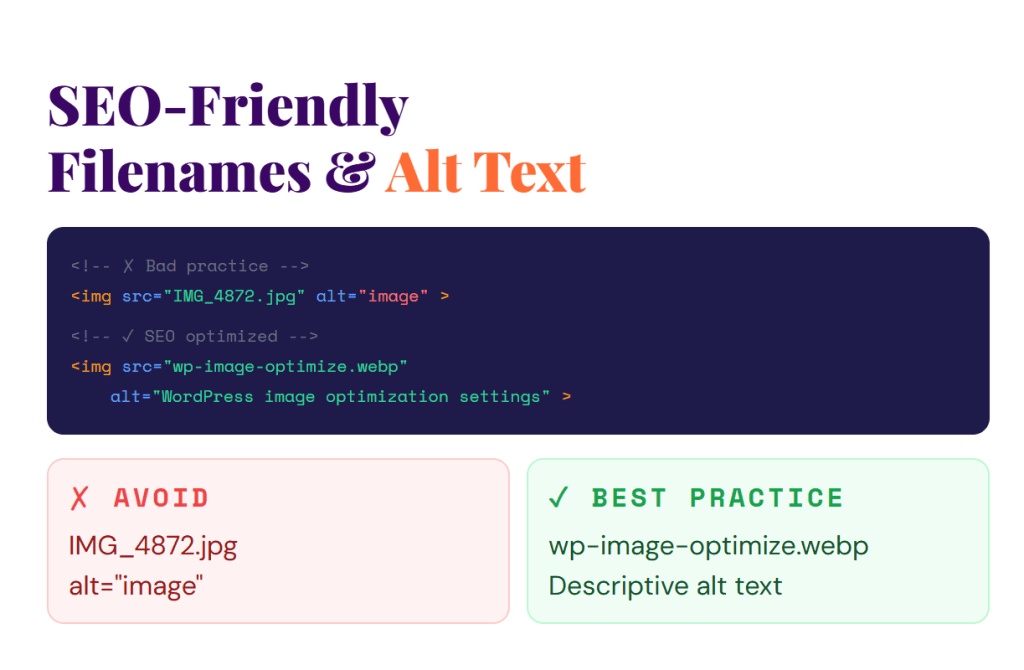
Use Descriptive, Keyword-Rich Filenames
Rename your image files before uploading. Instead of “IMG_4872.jpg”, use a descriptive name like “wordpress-image-optimization-tips.jpg”. Use hyphens between words, keep it concise, and include a relevant keyword naturally.
Write Meaningful Alt Text
Alt text serves two purposes: it helps search engines understand the image content, and it provides a text alternative for visually impaired users using screen readers. Write clear, descriptive alt text that explains what the image shows. Avoid keyword stuffing — write naturally as if describing the image to someone who cannot see it.
Example: Instead of “image1” or “wordpress plugin”, write “Screenshot of the ShortPixel image optimization plugin settings in WordPress dashboard.”
Additional Image Optimization Best Practices
Here are a few more techniques to squeeze every bit of performance from your WordPress images:
1. Define image dimensions in HTML/CSS: Always specify width and height attributes on your image tags. This prevents layout shifts and improves your Cumulative Layout Shift (CLS) score.
2. Use srcset for responsive images: WordPress automatically generates multiple image sizes and uses the srcset attribute to serve the appropriate size to each device. Make sure your theme supports this.
3. Avoid decorative images in content: If an image is purely decorative, use CSS to display it instead of adding it to your content — or use an empty alt tag so screen readers skip it.
4. Audit your media library regularly: Use a plugin like Media Cleaner to find and remove unused images that are taking up storage space.
5. Test your performance: Use tools like Google PageSpeed Insights, GTmetrix, or WebPageTest to measure your page speed before and after optimizing your images.
Conclusion
Optimizing images in WordPress is one of the highest-impact performance improvements you can make — and it does not require advanced technical skills. By choosing the right format, resizing before upload, compressing effectively, using a reliable optimization plugin, enabling lazy loading, and writing SEO-friendly alt text, you can dramatically reduce page load times and improve both user experience and search rankings.
Start with an audit of your current media library and pick one or two plugins to implement today. Even small improvements in image optimization can lead to measurable gains in traffic, conversions, and overall WordPress site performance. If you are looking to go deeper, explore other WordPress speed optimization topics like caching, minification, and database optimization as natural next steps.

0 comments